
How Can I Dry My Own Flowers?
It always seems a shame to see flowers dying off, and eventually putting them in the compost of bin, so why not try drying them next time you're given a bouquet, or treat yourself to some fresh blooms?
5 Different Methods for Drying Flowers
- Air Drying
- Silica Gel
- Microwave
- Pressing
- Baking
AIR DRYING
Air drying is probably the way most people try when they first have a go at drying flowers at home. It's a simple and cheap method, that requires nothing more than tying your blooms into small bunches, and hanging them upside-down in a dry, airy spot where they can naturally dry out over time - usually, a couple of weeks or more, depending on the time of year. As the blooms dry out, you will notice that the colours will darken and intensify. This is quite normal. Avoid damp and dusty areas to achieve the best possible result.

Equipment List
- Flowers of choice
- Twine or pegs
- Sharp scissors or snips
- A coat hanger or hanging airer
Method
- Remove any excess greenery and leaves from the stems that you don't wish to keep.
- Trim the ends to a length you want.
- Create small bunches of up to 4 stems, and tie them with the twine or secure them with a wooden clothes peg. Smaller bunches dry more quickly as the air can circulate more efficiently.
- Secure the bunches to the hanger with more twine or another peg. Hang to dry in a cool, dry and airy spot for up to 4 weeks - this will vary depending on the type of flowers.
SILICA GEL
Sodium silicate, or silica gel, is a substance that draws moisture from items nearby. You may have seen little sachets of it in packages that contain items easily damaged by dampness or condensation and wondered what they are. Silica is a naturally occurring substance, but these beads are created from a chemical process involving sodium silicate, which forms a gel that is then dried. For drying out flowers, you will need the fine version of this, sometimes called silica sand. This sand is great for carefully burying delicate blooms, creating a sandy bed, that allows for quicker drying than the air method previously outlined. Often coloured blue, treated with care, you can reuse silica sand over again until the blue crystals turn pink.
For the best results, use an airtight container and carefully cover your blooms in the sand. Seal it up to prevent external moisture from getting in, and wait for the blooms to dry. Many people prefer this method as it keeps the colours of flowers truer to their original. Silica sand can be found at craft shops or online.
Equipment List
- Flowers of your choice
- Silica Sand
- A generous container with lid
Method
- Prepare your flowers by trimming off excess leaves and stems, or removing flower heads completely depending on what you are going to do with them.
- Place the silica sand in the container, and then carefully nestle the flowers in the sand, taking care to then bury them.
- Cover with the lid, and leave until dry.
- Remove from the sand and carefully agitate the flower until it is free of excess sand.
Drying Time Guide
2-3 days
- anemone
- cornflower
- daisy
- delphinium
3-4 days
- campanula
- dogwood
- gypsophila
5-6 days
- dahlia
- ranunculus
- scabious
MICROWAVE METHOD
This method is a quick way to get your flowers bone dry. You will need the same silica sand as used in the previous method but rather than waiting for it to naturally dehydrate in the sand, you can fast-forward with microwave power. This way is best suited to individual stems or blooms, not full bouquets. Don't put the microwave on for any more than 20 seconds at a time, and keep checking to see the progress - you don't want to burn the flower!
Equipment List
- Flowers of your choice
- Silica sand
- Microwave safe container
- Water in a microwave safe cup
Method
- Prepare you flower by removing excess foliage and trimming the stem.
- Place the flower in the sand and carefully cover it with more sand.
- Place the container with the flower and the cup of water in the microwave, and blitz for 30 seconds.
- Check the progress and carry on at 30-second intervals until the flower is dry. This can take up to 4 minutes depending on the type of flower.
- To ensure a perfect result, remove the bowl from the microwave and cover with a lid, and then leave for a further 24 hours.
Drying Time Guide
Small, open-faced flowers:
e.g. Gypsophila, buttercup, viola
no more than 1-2 minutes before checking if longer is required
Medium flowers:
e.g. Daisy, digitalis, delphinium
no more than 2-3 minutes before checking if longer is required
Larger flowers:
e.g. Carnations, rose, peony
no more than 4 minutes before checking if longer is required
PRESSING
Once a common method of preserving flowers, many children will remember pressing flowers between tissue paper in a heavy book and marvelling at the results a few weeks later. There are of course wooden presses specifically designed for the job, which will prevent any mishaps with precious books. Here's a mini-guide on the different methods of pressing flowers.
Different Methods of pressing Flowers:
Book Pressing
Equipment Required
- Flowers
- Large, heavy book
- Parchment or tissue paper to absorb moisture
- Additional weight
Method
- Prepare your flower by removing unwanted leaves.
- Lay flat it on the absorbent paper.
- Open up the book to the centre - feel free to line the pages with something waterproof like acetate sheets to protect the pages if the book is precious - and lay the tissue and the flowers onto the page.
- Place a sheet of absorbent paper on top of the flower, taking care to arrange it how you would like it to be frozen in time, and close the book.
- Weight it down, using more books or a heavy pot or stone.
- Wait up to 4 weeks before checking to see if it's ready.
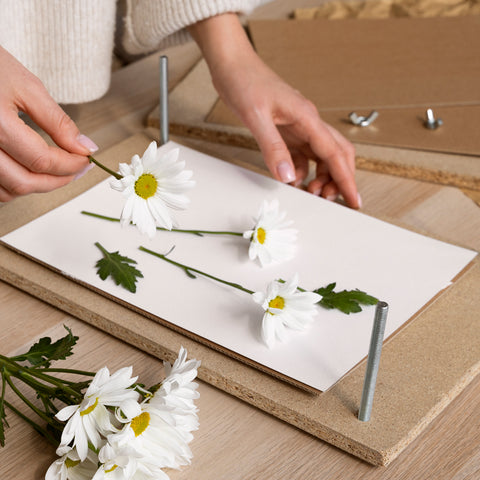
Flower Press
Equipment Required
- Flowers
- Flower press
- Absorbent paper
Method
- Prepare your flowers by removing any unwanted leaves.
- Open up the press as per the manufacturer's instructions.
- Line the wooden frame with absorbent paper.
- Arrange the flowers on the paper.
- Rebuild the frame and screw down tight.
- During the next 4 weeks, replace the absorbent paper several times so the colours remain strong and don't go brown.
- When completely dry, remove and use as you wish.
Iron
Equipment Required
- Flowers
- Absorbent paper
- An iron
- A heavy book
Method
- Take the prepared flowers and place them between two sheets of absorbent paper.
- Use a book to press down and pre-flatten the flowers so they are easier to iron.
- Use an ironing board and iron on a low setting (with no steam) and press the flowers between the paper for around 15 seconds.
- Allow the paper to cool, and repeat this cycle of ironing and cooling until the flowers are dry.
Microwave
Equipment Required
- Flowers
- Microwave proof plate
- Absorbent paper
Method
- Place the prepared flowers face down on a sheet of absorbent paper, and then cover them with another sheet.
- Place the paper and flower parcel onto the microwave tray and then put the plate on top.
- Set the microwave to low for 30 seconds and repeat until the flower is dry.
- Handle the plate with caution in case it gets hot.
Oven Drying
Equipment Required
- Flowers
- Parchment paper
- Baking sheet
Method
- Set the oven to the lowest temperature.
- Line a baking sheet with parchment paper.
- Lay the flowers on the sheet, ensuring they don't overlap.
- Place them in the oven, leaving the door ajar so moisture can evaporate.
- Leave for eight to twelve hours for the flowers to dry out completely.
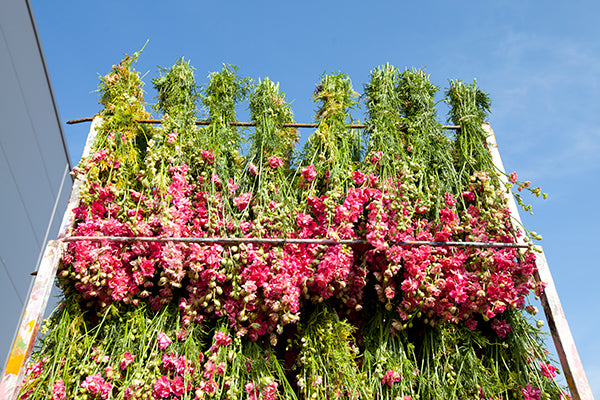
COMMERCIAL FLOWER DRYING
The most common commercial flower drying method is air drying. This is the lowest cost way of ensuring flowers are dried and remain in pristine condition with their colour vibrant. The only difference between drying flowers at home and large-scale production is the racking system used. Rather than a couple of bunches, there will be hundreds on a single rack!
At Atlas Flowers, we work with some excellent suppliers who have honed this drying method to produce top-quality dried flowers in a sustainable way. Keeping mechanisation down to a minimum means the carbon footprint of production is kept low. Even the production plant sources its power from renewable means and recycles water wherever possible.
All the flowers are grown outside in natural conditions, without using harmful chemicals. The staff harvest the products by hand to ensure minimal damage, before they are transferred to the drying racks to dry.

Once dried, the flowers are packed by hand in recycled cardboard boxes, ready to be delivered to our warehouse. In turn, we pick, pack and wrap by hand, and use as much recycled material as possible to get the products to you in tip-top condition.
If you are looking for a wide range of ready dried flowers to press, why not take a look at our full range!
Share your dried flower creations. We hope you're feeling inspired to make something amazing with our dried flowers. Why not share your designs and makes with us on social media? There's nothing we like more than to be tagged on Instagram when you've made something beautiful using our products. If you would like to have your design or installation featured on our story, just get in touch!